Are you looking for some simple long hair style suggestions for back to school? Check out these easy braiding tutorials!
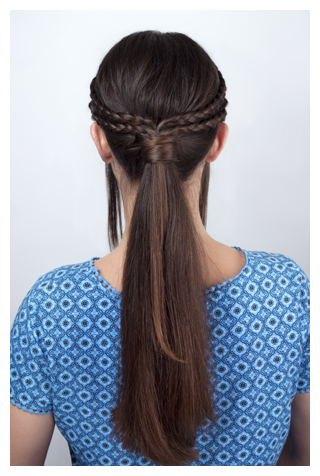
 Side Braid Accent
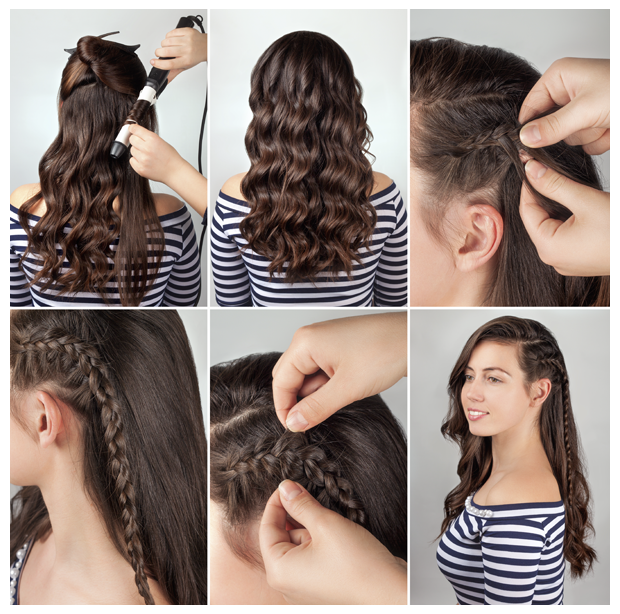
1. Starting with dry hair, mist large sections of hair with styling spray and warp around a curling wand. Hold in place a few seconds and release. Repeat with next sections until all hair has been curled.
2. When done, run fingers through your hair and it all so the sections fall into soft waves.
3. Create a slightly messy side part. Take a one-inch thick vertical section at the front hairline and then subdivide it into three equal parts. Make one stitch of a classic three-strand braid and then as you progress with the next stitch, add a small section of hair from the bottom to the closest subjection in the braid. Do the same thing from the top side and then produce another stitch in the braid. Continue as you braid horizontally across the side of the head.
4. About one inch behind the ear, only take up hair from the bottom section, which will cause the braid to start to follow the roundness of the ear. Create a couple of more stitches and then finish the rest of the length without adding any more hair.
5. Loosen the braid by lightly pulling on both sides.
6. Finish off with an accent hair tie and you are good to go!
 Simple Waterfall Braid
1. Starting with dry hair, mist large sections of hair with styling spray and warp around a curling wand. Hold in place a few seconds and release. Repeat with next sections until all hair has been curled.
2. When done, run fingers through your hair and it all so the sections fall into soft waves.
3. Take a vertical section of hair at the temple, divide into three. Add a small amount of hair to the top section and then and do one stitch from a three-strand French braid. Drop the lowest section, but pick up a new section right next to it and continue with another stitch. Add another section from the top and then drop the bottom section. Continue, as you work towards the center of your hair in back.
4. Do the same thing from the other side.
5. Pull the two sections together in back and secure with a small elastic band.
 Bubble Pony
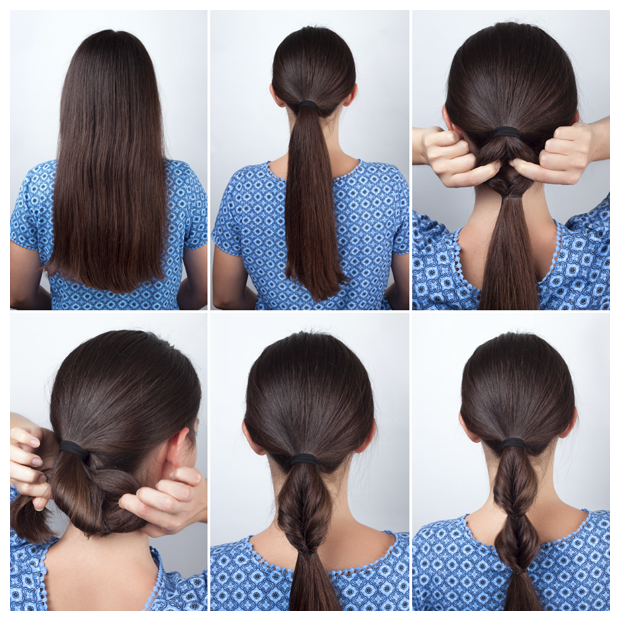
1. Start with smooth, dry hair.
2. Gather your hair in back at the nape of your neck and place hair into a low ponytail, securing it with a coated elastic band.
3. Several inches down the length of the ponytail, add another elastic band. Use your fingers to create a divide in the hair between the elastic bands.
4. Lift the length of your ponytail and pull it through that hole.
5. The result will look like this.
6. Add another elastic band several inches down from the other one and repeat the same process above. Continue adding more elastic bands and creating bubble sections until you run out of length
 Double Braid Pony
1. Start with smooth, dry hair.
2. Take a vertical section of hair at your temple. Sub-divide it into three sections and then create a classic three strand braid all the way down, securing at the ends with a coated elastic band.
3. Repeat on the other side.
4. Secure the two section together at the back of your head with another elastic.
5. Create another braid on each side and secure them together in back.
6. Leaving about an inch of hair out at the nape of the neck, gather the rest of your hair including the braided sections and secure with a coated elastic band.
7. Take the remaining hair at your neck and wrap it around the base of the ponytail to cover the elastics.
8. Pin the ends into the base of the ponytail.