Priyanka Chopra of ABC’s Quantico heats up the red carpet with her signature looks. Graced with thick, wavy locks, this exotic beauty always steps out in style. Here are just a few of her more recent hairstyles and the products, tools and style tips to help you achieve her look.
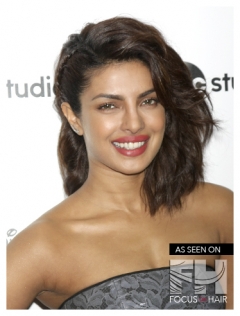
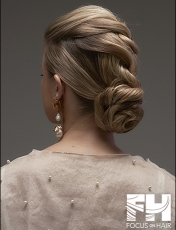
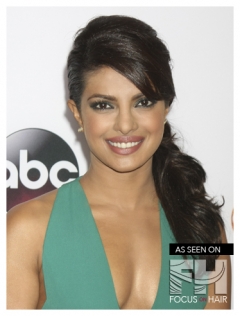 Go for simple elegance with this delicate side-swept hairstyle.
Get The Look: Add a light styling lotion on damp hair and then mist your roots with styling spray. Blow dry sections using a large round brush to help control any natural texture but to also help add volume at the roots. Lift up on the sections and you blow-dry and turn the brush several times as you work throughout the entire head.
Mist large sections with working spray and, while avoiding the roots, curl section with a large curling iron. Continue until all hair is curled. Run a soft bristled brush through your hair, craft a side part and then pull your length low and to one side. Secure with an elastic band. Cover the band with a decorative accessory or wrap with a section of hair taken from under the ponytail.
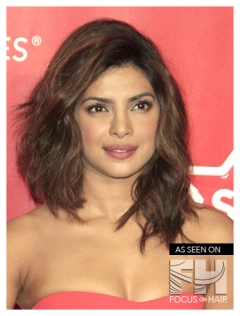
Shoulder-touching layers are laced with fullness and soft, barely-there waves.
Get The Look(s): Apply texture spray on damp hair and rough dry with your fingers. Once completely dry, mist all over with working spray and loosely wrap sections around a curling rod, keeping the ends out for a lived-in appeal. Alternate curl direction from section to section. Run fingers through to break up sections, finger-style hair into place and mist with more working spray to hold.
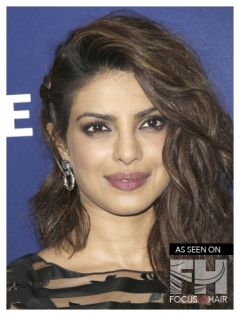
For a fun variation and to dress things up a bit, either pin one side back and add a decorative accessory or braid one side and pin it back.
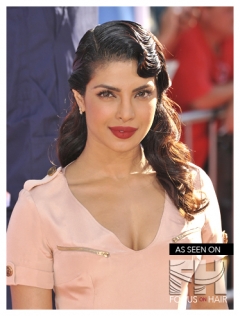 Pinned-back fingerwaves give long hair a sense of nostalgic glamour.
Get The Look: If you don’t have any natural curl or strong waves, use this technique first:
Starting with dry hair, mist small sections really well with working spray and curl each in the same direction using a ¾-inch curling iron. Pin curls up to cool. Once cooled, undo pins and run a soft brush through to create a rolling wave.
If you have natural curl or wave, use sculpting or wet set gel on damp hair and then set hair into a fingerwave pattern using the following technique:
Use a rattail or pintail comb to direct the surface on one side of your hair into place, working with the natural swoop of each wave. Hold swoop in place with your fingers as you place a clamp and then coax the wave the other direction with your comb and fingers. Continue back and forth, and clamping until that section runs out of hair. Continue with the other side and then on to the back of the head. Once all sections are done, either allow hair to air dry thoroughly or sit under a hood dryer until completely dry.
To get Priyanka’s pinned back look, remove clamps, roll sections at each side back and pin into place.
Do note that fingerwaves take a bit of practice, so don’t get frustrated. Also, the product used on your hair depends of your hair type, texture and thickness, so adjust accordingly.
Still need some help? Consider one of these YouTube tutorials:
How to do fingerwaves on dry hair: https://www.youtube.com/watch?v=7Qzrrr99o2A
Wet set with natural wave / curl: https://www.youtube.com/watch?v=loOcIy4HtdM

